WYKEHAM HENRY KOBA FREAME, DCM
an ANZAC in the family
(thumbnails are links to larger files)
Page 3 |
|
At 6:15am on that fateful day of 25th April, 1915, the men started disembarkation, at Gaba Tepe, and an hour and a half later all were safely ashore. Less than an hour later and they 'received orders to send Company forward. B Company moved out but were halted...' An hour later, at 9:30, they 'Received orders to reinforce Col. MacLagan of the 3rd Brigade'.
'The whole Battalion was thrown into the firing line and worked independently of Bn Hd Qrs' [Battalion Head Quarters]
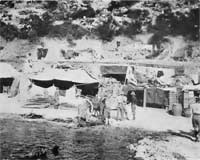
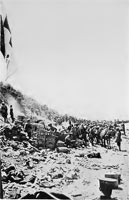
Early hospitals on Anzac beach
|
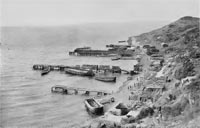
Anzac cove ... Suvla Bay, over
Ari Burnu Point, to the north
|

Maclagan's ridge and Anzac
beach on 26th August, 1915
|
The next entry is 4 days later, but the intervening 3 days are described as 'A Terrible Three Days' in 'Australia in Arms'. In this chapter the author relates the confusion and horror; the slaughter and bravery of the MEF. Written with flair and drama, by a journalist who was in the Dardanelles at the time, it doesn't fall into the trap of over dramatisation and journalistic creativity. It tells it as it probably was but in a way that grabs our attention. The following excerpts serve to add some 'flesh' to the laconic entries in the War Diaries:
'A landing party had been repulsed with heavy losses, finding the beach a mass of barbed-wire entanglements, and machine guns concealed in the clififs. Hang on and dig, hang on to the edge of the second plateau, back on to which they had been lorced after the charge across the three ridges to the last lines of hills that looked down on the green, cultivated plains stretching almost to the Dardanelles, was all the Australians could do now. As far as possible the officers were endeavouring to reorganize their companies and battalions. Brigadiers have explained to me how for days, as they could, they gathered 50 or 60 men from this unit and that, and would communicate with the brigadier next along the line, and a transfer would be effected. It was not possible to let many men from the firing-line at one time, as the Turks were furiously making preparations for attack....
At the apex of the line, the head on Monash Gully, the great Turkish attack of the day developed. Two ridges met here, and formed what was named at once the " Nek." The Sari Bair ridge ran at right angles to the beach, beginning with what had been named Walker's Ridge and Russell Top, and continuing on past Chunak Bair to Hill 971, or Koja Chemin Tepe. Just above Russell Top the broad plateau (on the edge of which most of the Australian army now clung desperately) joined the Sari Bair ridge at the Nek. This main Australian ridge ran in a bow round to Gaba Tepe. So steep was the head of the gully and so cut up with hills (for a spur ran out from the very centre of it - Pope's Hill) that it was not possible to get a continuous line of trenches across to the Nek. There was no alternative but to dig in here from Russell Top, down across the gully, and up again on to the knob which struck out into the gully, dividing its head in two (called subsequently Pope's Hill), and from this point across to Quinn's Post, so linking up with the rest of the right of the line. The summit of the arc, as I have described our position - now for the first time more definitely defined was the gully. On the left the New Zealanders held Walker's Ridge, Plugge's Plateau, and the section of Russell Top, and the trenches leading down on their left into the valley; with the result that the Turks chose this point as the best for breaking through our position and coming in behind our lines. Had they succeeded in their endeavours, which lasted till Wednesday, itwould have meant the cutting of Anzac in two ...
Farther along the line M'Cay's Hill and Braund's Hill, in the centre of the right of the position, were subjected to a furious bombardment by the Turkish artillery, and their machine guns were playing on these points until nearly three o'clock, when the attacks of the Turks began to increase in fury. They sent wave after wave of men against our lines, and the 8th Battalion were forced to retire to the edge of the ridge. The enemy now came across from up Happy Valley and other gullies on the right, and were threatening to break through and get behind our lines round M'Cay's Hill ...
Again and again during Monday night and Tuesday the Turks charged and counter-attacked along the whole front, but the Australians, confident of their prowess after twenty -four hours' continuous fighting, grimly held their ground. They had learned that trenches gave some protection from shrapnel, and those that were not fighting were burrowing like rabbits, digging in, while their comrades held the line. The Turks continued to direct their hardest blows against the centre, but as fast as they hurried up their reserves so did the Australians come hurrying up from the beach. The unloading of the shells and supplies had proceeded rapidly now that it had been determined to hold on. The Anzacs had come for good, they left no doubt about that, and, with the guns firing from the very trenches, it was with a cheer that the lads waited for the Turks ...
The failure of the Turks to smash the resistance in the first days determined the success of the Australians. Fit as no troops have been, fit for fierce fights, from thence onward the invaders had a contempt for the Turks, and only were anxious that he should attack. In those few early days it is said that the Turks suffered nearly 50,000 casualties at Anzac and Cape Helles. Ours were over 8,000, and the British twice as many again. The enemy left thousands of dead on the battlefield before the trenches . But while they were reorganizing their great attack on Wednesday there was a lull, a curious solemn quiet that spread all along the line, which had ceased to spit and splutter except in a spasmodic way. On Tuesday the commencement of the reorganization of the Australian army was begun. It was completed by Friday. Anzac, after four days' fighting, was established.'
[12. from Chap. 12, Australia in Arms' by Phillip F.E. Schuler]
 |
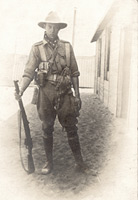
It was during those first 3 days that Henry won the DCM. His citation in the London Gazette, 3rd July 1915, reads :
'On 25th April, 1915, and subsequently during the operations near Kala Tepe, for displaying the utmost gallantry in taking water to the firing line although twice hit by snipers.'
It was these two bullets, removed from the wounds, that were eventually given to Flossie and her sister Lily by Henry, and which they treasured until their own deaths. Both were engraved, 'Dardanelles - 1915', |
In Vol. 1 of 'The Official History of Australia in the War of 1914-1918' Henry gets 2 or 3 mentions by name. the first, on 25th April, on p. 309:
'It was about 3.15 p.m. when Margetts left Lalor. Lalor had moved across Malone’s Gully onto the spur at the farther side. Here he took up a line under the fierce fire from the far edge of the spur and from the lower hills on the left ...
The responsibility of that long day had rested as heavily upon Lalor as upon any officer in the force and, as the hours drew on, the difficulties were becoming heavier ...
Lalor had by this time dropped his sword - hours later it was found back at 'The Nek' by Lance-Corporal Harry Freame, of the 1st Battalion, who in his turn dropped it in the stress of the fighting at dusk ...
Most of the officers had fallen. The shrapnel fire on the head of 'Malone’s Gully' and 'The Nek' was exceedingly heavy. The shells were burst well, ten or fifteen feet above the ground. The pellets swished through the low scrub and down the valley head like hail. At the head of 'Malone’s Gully' one shell burst over Lieutenant G. W. Brown, of the 2nd Battalion. wounding six men, but leaving Brown unharmed. Captain Tulloch, sheltering with some men under the edge of the same gully, had crept up onto the spur to reconnoitre, when he was wounded ...
On the left of the line there were now practically no officers surviving. A remnant of the 12th, on the seaward slope near the head of 'Malone’s Gully', was being led by a corporal, E.W.D. Laing. the senior among about sixty men of all units who were around him ...
On the extreme left, sheltering in the head of 'Malone’s Gully' were now about fifty men of all units without any officer at all.'
[7. 'The Official History of Australia in the War of 1914-1918' by C.E.W. Bean, Vol. 1, Chap. 14, 'The Loss of Baby 700' p. 309 - 310]
The next ones are on p. 316 and p. 333, both relating to the same situation:
'About 3 o’clock on the afternoon of April 25th the Turks who forced Layh to leave the 'Fisherman’s Hut' began to work over or around the four seaward fingers of Baby 700 towards Walker’s Ridge itself. General Bridges was aware of the importance of this Ridge-the only possible position for his left flank-and he had decided to reinforce it with the remaining New Zealand battalions. But the landing of the New Zealanders had been interrupted, and the Turkish attack which developed against 'Walker’s Ridge' about nightfall \vas faced by a few scattered handfuls of men.
The slender garrison may be thus enumerated.The beach at the foot of the ridge was empty until Lieutenant Shout of the 1st Battalion, after taking reinforcements up to Braund on the Top, garrisoned it with a few men collected by himself and Lance-Corporal Freame. Above them the razorback crest of the spur was occupied by a party of Australians and New Zealanders under Captain Critchley-Salmonson of the Canterbury Battalion. Salmonson, with some of the Canterburys, had been in reserve on Plugge’s at about 2 p.m., when a note reached him from Major Stuckey‘ of the Auckland Battalion, who was near 'The Nek', to the effect that the Turks were moving round the left and that ammunition was running out. Salmonson took his platoon of New Zealanders and reached a point about half-way up Walker’s Ridge, below the knoll and the gap, which were then its chief features. He had with him here a few men of the 9th, 11th, and 12th Australian Battalions, who had retired towards the beach from the fighting on Baby 700. His party did not amount to fifty.'
[7 'The Official History of Australia in the War of 1914-1918' by C.E.W. Bean, Vol. 1, Chap. 15, ''The Extreme Left'' p. 332-333]
The 'War Diaries' for the 1st Battalion continue:
on the 29th April, 'The Battalion was withdrawn from the firing line to the beach to rest and reorganise.
On the 30th April, we read,'The Battalion still resisted'.
The following day, 1st May, they, 'Received orders to relieve portion of the firing line - moved out and reported to General Trotman'.
2nd May, they 'Relieved marines on two portions of section 2 of defensive line under General Walker as Brigadier. A & B Companies on left then 2 companies of 4th Battalion & then C & D Companies of of this Battalion.
The next entry, for 3rd May has the location Anzac [Bay] recorded, replacing previous 'Gaba Tepe' 'During day improved and dug new trenches'. 'Worked at trenches day & night - enemy kept up a desultory unaimed fire all night - six new officers & 2 reinforcement officers gazetted, namely - Cunningham - Burns Rickwood Thompson Shirt Wells King & McIntyre'.
The whole of Chapter 17 of 'Australia in Arms'[12] is given over to describing Anzac Cove and the conditions starting ...
'The evolution of Anzac was as the growth of a mining settlement. Little had been done by the Turks in their defensive preparations to disturb the natural growth that spread from the crest of Maclagan's Ridge almost down to the water's edge - a growth of holly bush, a kind of furze, and an abundant carpet of grasses, wild flowers, poppies, and anemones. Round Ari Burnu their line of shallow trenches had run along to the Fishermen's Huts, but there were no tracks, other than the sheep or goat track round the base of the cliffs that the farmers might have used coming from Anafarta on to the plains below Kelid Bair and across to the olive -groves, on the way to Maidos and the villages along the peninsula road to Cape Helles. Anzac Beach - " Z " Beach in the scheme of operations - was covered with coarse pebbles, occasionally a patch of sand. Barely 20 yards wide, and 600 yards long, the hills and cliffs began to rise steeply from it. The shore was cleft in the centre by a gully - Bully Beef Gully - which opened into the Cove. It was no more than a sharp ravine, very narrow, and in the days of April and in November very moist, and wet, and sticky. It took very little time after the dawn of day on that April Sunday morning for the point of concentration to be fixed on in this Cove. The whole of the stores, equipment, as well as the troops, were landed from end to end of the beach.. Somehow there was a feeling of greater security in this Cove, but in fact it was so shallow, so accurately plotted in the enemy's maps, that the Turks had little difficulty in bursting the shells from one end of it to the other at their will. Luckily, the water was fairly deep almost up to the shore. Twenty yards out one found 15 feet of water and a stony bottom, which enabled the picket boats and pinnaces to come close in, as it allowed barges to be drawn well up to the beach, so that the stores could be tumbled out. Photographs, better than word pictures, describe that beach in those first days and weeks. Ordnance officers of both Divisions, as well as of the Army Corps, wrestled with the problem of making order out of chaos. Once the army was to stick, it had to stick " By God ! " and not be allowed to starve, or want for ammunition or entrenching tools. A small stone jetty was the first work of the Engineers, and this was rapidly followed by a jetty that the signallers, under Captain Watson (for the Engineers had vastly more important duties that called them away up to the gullies and the firing-line), constructed. But that was done after the second week. The Army Medical Corps worked in a dressing-station, just a tent with a Red Cross fiying overhead ...'
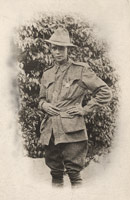
Troops going into the
firing line on the first
day of the landing
|

Beach clearing station
in the early days
|
|